What is “React”??
- 인터렉션이 늘어남에 OR 관리 해야할 Dom 이 많아질수록 관리하기가 힘들어짐
- 프론트 엔드 라이브러리, 프레임웍 많이 있다. 그중에 하나가 React 이다.
-
Component 는 데이터(ex: Props, State)를 입력받아 DOM Node를 출력하는 함수의 역할을 합니다.
-
Component 는 UI를 구성하는 개별적인 뷰 단위입니다. Application은 이런 Component들이 모여 마치 블럭을 조립하듯 완성됩니다.
-
각 Component 들은 Application의 다른 부분, 또는 다른 Application에서 쉽게 재사용이 가능합니다.
-
Component 를 사용하는 이유는 뭘까요? Application의 구성요소를 작은 단위로 나누어서 관리를 하게되면 유지 보수, 재사용이 매우 용이해지기 때문입니다!
알아야 할 ES6 문법들
1) Destructuring(구조 분해)
2) spread operator(전개 구문)
3) rest parameters
4) default parameters(기본 매개변수)
5) template literals
6) arrow function(화살표 함수)
7) for-of loop
1.Destructuring(구조 분해)
배열이나 객체의 속성을 해체하여 그 값을 개별 변수에 담을 수 있게 하는 JavaScript 표현식
var a, b, rest;

[a, b] = [10, 20];

console.log(a); //10
console.log(b); //20

[a, b, ...rest] = [10, 20, 30, 40, 50];

console.log(a); //10
console.log(b); //20
console.log(rest); //[30, 40, 50]


({ a, b } = { a: 10, b: 20 });
console.log(a); // 10
console.log(b); // 20

({a, b, ...rest} = {a: 10, b: 20, c: 30, d: 40});
console.log(a); // 10
console.log(b); // 20
console.log(rest); // {c: 30, d: 40}

var x = [1, 2, 3, 4, 5];
var [y, z] = x;
console.log(y); // 1
console.log(z); // 2


선언에서 분리한 할당

var a, b;

[a, b] = [1, 2];
console.log(a); // 1
console.log(b); // 2


기본값

var a, b;

[a=5, b=7] = [1];
console.log(a); // 1
console.log(b); // 7


변수 값 교환하기

var a = 1, b = 3;

[a, b] = [b, a];
console.log(a); // 3
console.log(b); // 1


일부 반환 값 무시하기

function f() {
    return [1, 2, 3];
}

var [a, , b] = f();
console.log(a); // 1
console.log(b); // 3

반환 값을 모두 무시할 수도 있음
[,,] = f();


새로운 변수 이름으로 할당하기

var o = {p: 42, q: true};
var {p: foo, q: bar} = o;
//var foo = 42; // 이것과 동일하다.
//var bar = true; // 이것과 동일하다.


//[foo, bar] = [42, true]   같다 왜??


console.log(foo); // 42

console.log(bar); // true
2.spread operator(전개 구문)
배열이나 문자열과 같이 반복 가능한 문자를 0개 이상의 인수 (함수로 호출할 경우) 또는 요소 (배열 리터럴의 경우)로 확장하여, 0개 이상의 키-값의 쌍으로 객체로 확장시킬 수 있음.
function sum(x, y, z) {
  return x + y + z;
}

const numbers = [1, 2, 3];

console.log(sum.apply(null, numbers)); //6
console.log(sum(...numbers)); //6
//함수에 배열을 인자로 넣고 싶을 대, apply대신 배열을 전개해서 사용할 수 있다.


구문


myFunction(...iterableObj);


[...iterableObj, '4', 'five', 6];


let obj = {a: 1, b: 2};
let objClone = { ...obj }; //얕은 복사
console.log(objColne); //{a: 1, b: 2}


배열의 연결(concat 대신 사용)


var arr1 = [0, 1, 2];
var arr2 = [3, 4, 5];
arr1 = arr1.concat(arr2); //arr1: [0, 1, 2, 3, 4, 5]


var arr1 = [0, 1, 2];
var arr2 = [3, 4, 5];
arr1 = [...arr1, ...arr2]; //arr1: [0, 1, 2, 3, 4, 5]
3.rest parameters
- 정해지지 않은 수(an indefinite number, 부정수) 인수를 배열로 나타낼 수 있게 함.
function sum(...theArgs) {
  return theArgs.reduce((previous, current) => {
    return previous + current;
  });
}

// 만약 function sum(arguments) 으로 하면
// sort, map, forEach 또는 pop 같은 메서드 가 되지 않는다.

console.log(sum(1, 2, 3)); //6
console.log(sum(1, 2, 3, 4)); //10


Rest 파라미터와 arguments 객체간의 차이

`Rest 파라미터`는 구분된 이름(예, 함수 표현에 정식으로 정의된 것)이 주어지지 않은 유일한 대상인 반면, arguments 객체는 함수로 전달된 모든 인수를 포함합니다.

`arguments 객체`는 실제 배열이 아니고 rest 파라미터는 Array 인스턴스로, sort, map, forEach 또는 pop 같은 메서드가 바로 인스턴스에 적용될 수 있음을 뜻합니다.
즉 arguments 객체는 자체에 특정 추가 기능이 있습니다 (callee 속성처럼).


Rest 파라미터 해체

function f(...[a, b, c]) {
  return a + b + c;
}

f(1)// NaN  (b 와 c 가 undefined)
f(1,2)// NaN  ( c 가 undefined)
f(1, 2, 3)    // 6
f(1, 2, 3, 4) // 6 (4번 째 파라미터는 해체되지 않음)
4.default parameters(기본 매개변수)
기본 함수 매개변수(default function parameter)를 사용하면 값이 없거나 undefined가 전달될 경우 매개변수를 기본값으로 초기화할 수 있음.
function multiply(a, b = 1) {
  return a * b;
}

console.log(multiply(5, 2)); //10
console.log(multiply(5)); //5 // 5 * 1
5.template literals
내장된 표현식을 허용하는 문자열 리터럴입니다. 여러 줄로 이뤄진 문자열과 문자 보간기능을 사용할 수 있습니다. 이전 버전의 ES2015사양 명세에서는 “template strings” (템플릿 문자열) 라고 불려 왔습니다.
var text = `hello`;
console.log(`text: ${text}, type: ${typeof text}`);
//text: hello, type: string
6.arrow function(화살표 함수)
화살표 함수 표현(arrow function expression)은 function 표현에 비해 구문이 짧고 자신의 this, arguments, super 또는 new.target을 바인딩 하지 않습니다. 화살표 함수는 항상 익명입니다. 이 함수 표현은 메소드 함수가 아닌 곳에 가장 적합합니다. 그래서 생성자로서 사용할 수 없습니다.
화살표 함수는 항상 익명입니다.
var materials = [
  'Hydrogen',
  'Helium',
  'Lithium',
  'Beryllium'
];


materials.map(value => value.length);
// //Array [8, 6, 7, 9]
7.for-of loop
for…of 명령문은 반복가능한 객체 (Array, Map, Set, String, TypedArray, arguments 객체 등을 포함)에 대해서 반복하고 각 개별 속성값에 대해 실행되는 문이 있는 사용자 정의 반복 후크를 호출하는 루프를 생성합니다.
const array1 = ['a', 'b', 'c'];

for (const element of array1) {
  console.log(element);
}
// expected output: "a"
// expected output: "b"
// expected output: "c"

Map의 대한 반복문

인스턴스의 키와 value 값을 가져온다.

let iterable = new Map([["a", 1], ["b", 2], ["c", 3]]);

for (let entry of iterable) {
  console.log(entry);
}
// [a, 1]
// [b, 2]
// [c, 3]

 인스턴스에 value값을 가져온다.

for (let [key, value] of iterable) {
  console.log(value);
}
// 1
// 2
// 3
——————————————————————————
JSX
JSX 란?
JSX 규칙
-
반드시 하나의 엘리먼트로 감싸야 한다.
-
자바스크립트 코드를 적용할 땐 { } 안에 작성한다.
-
JSX 내부에선 if문을 사용할 수 없다. IIFE or 삼항연산자 사용
-
엘리먼트의 클래스 이름을 적용할 때, className 을 사용(class는 ES6에 존재하기 때문)
Component
컴포넌트?
- 개념상 컴포넌트는 자바스크립트 함수와 비슷함.
- 독립적으로 기능할 것과 재사용 가능할 것
- 재사용성과 코드 관리에 용이
- 하나의 컴포넌트가 하나의 기능만 하게 햐야한다 왜냐하면 에러 발생시 용의하다.
Functional component vs Class component
-
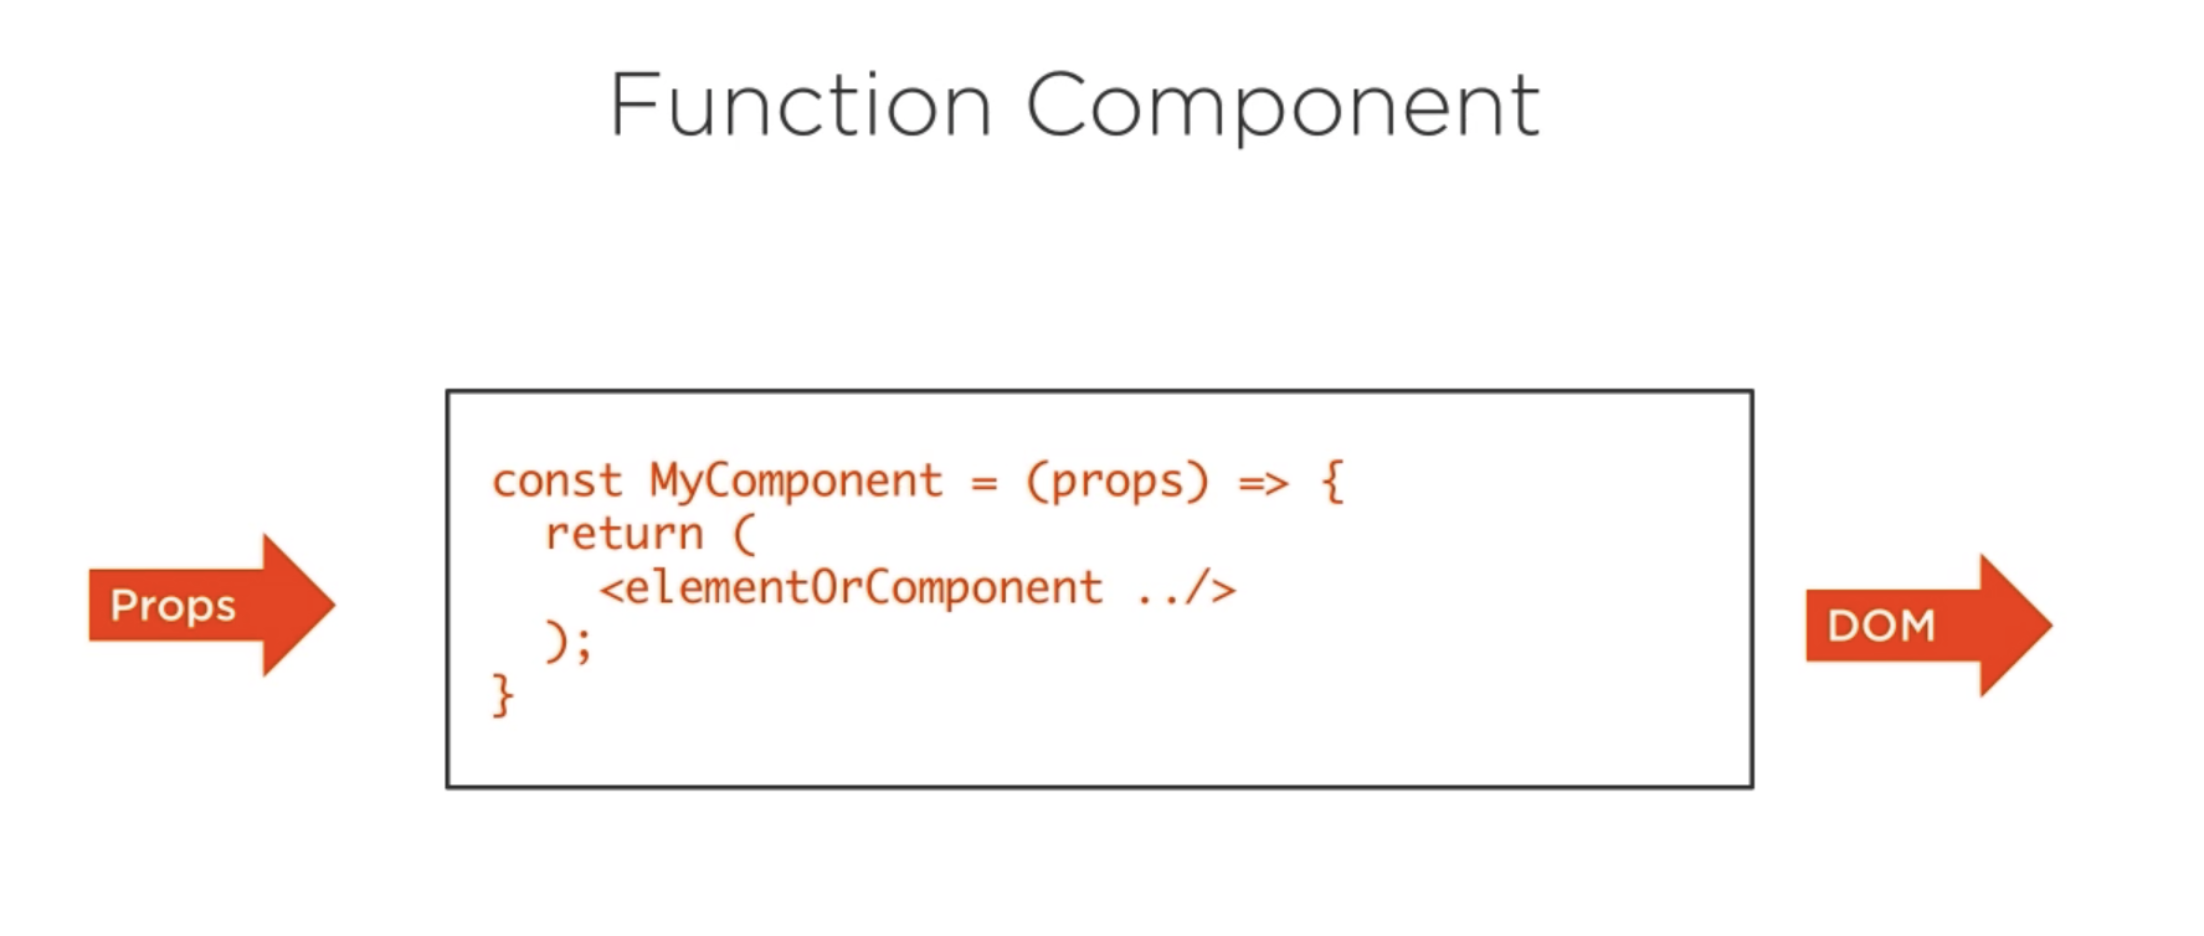
함수형 컴포넌트 생성 방식
-
prop 값의 변경 없이 바로 렌더하고자 할 때 사용한다.
function Welcome(props) {
    return <h1>Hello, {props.name}</h1>;
}
-
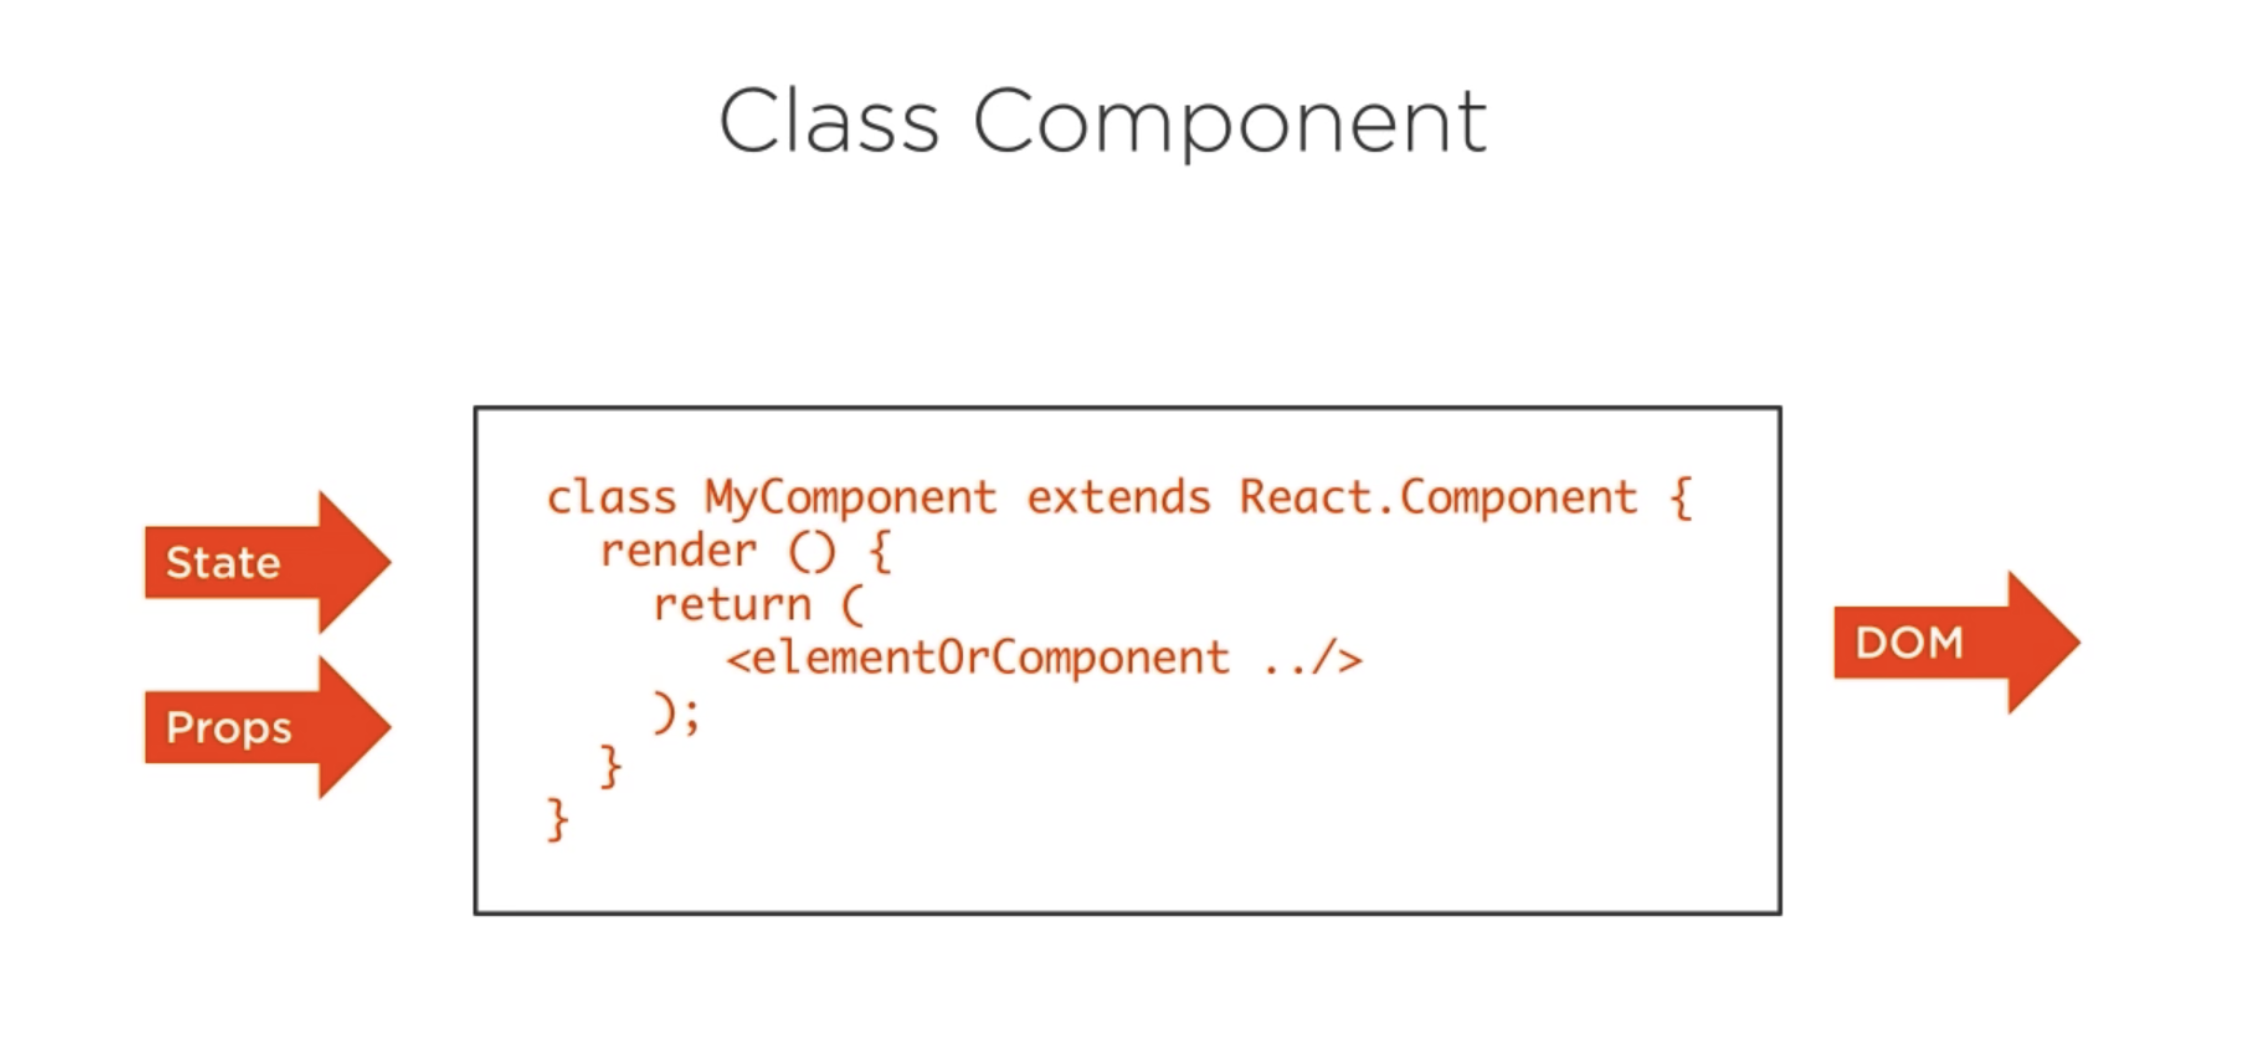
클래스 컴포넌트 생성 방식
-
method를 사용해야 하고, 클래스 내에서 state 관리 할 수 있고, life cycle에 맞춘 함수 관리가 가능하다.
class Welcome extends React.Component {
    render() {
        return <h1>Hello, {props.name}</h1>;
    }
}
Props 란?
부모 컴포넌트가 자식 컴포넌트에게 내려주는 데이터
- 변경불가 - 고정값
- 일기전용
- String,number function 내려준다.
state
- state 란?
컴퍼넌트의상태 컴포넌트 안에서 관리해야 한다. setState 메소드를 이용하여 변경해야 한다. 왜냐하면
1 재랜더링 하기위해 2. 가상돔이 인지하지 못해서
- state가 변경되는 것은 동기 VS 비동기 ?
setState 메서드 자체는 동기로 작동 하지만 내부에서 state 값을 업데이트하는것은 비동기
state의 특징??
클래스 컴포넌트에서 사용가능 immutable 하다 컴포넌트 내부에서만 접근 가능하다. 변경하려면 SetState사용 state 변화의 결과로 life cycle 이 순환한다.
Life Cycle
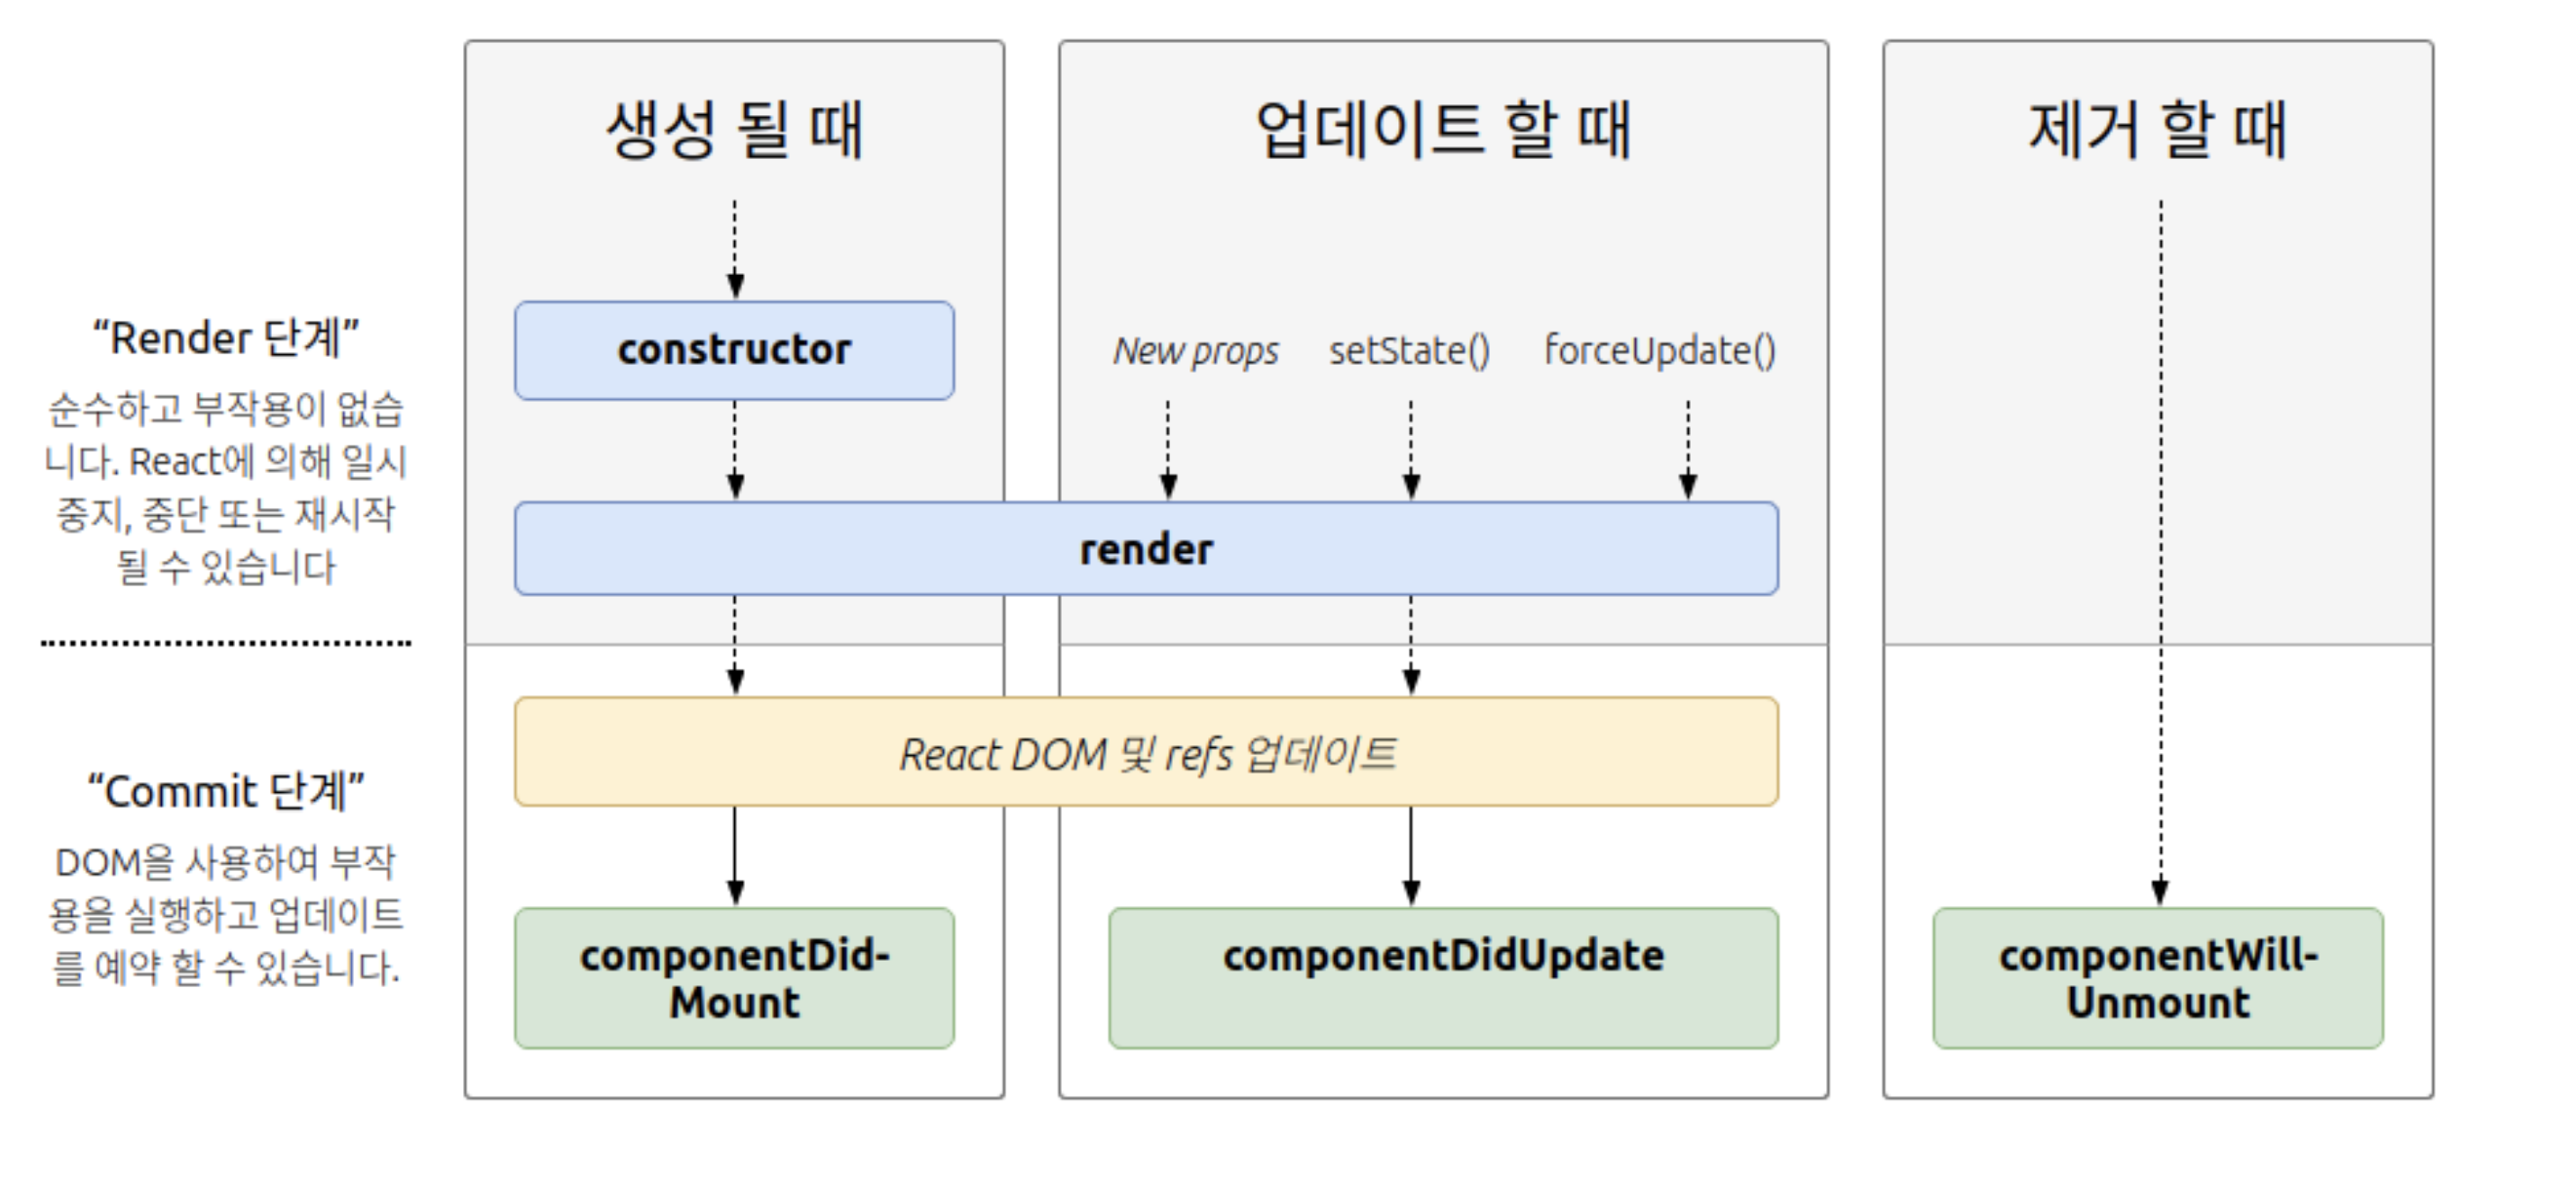
- Life Cycle 란?
컴퍼넌트가 생성되고 업데이트되고 사라질때 항상!!! 보장된 타이밍에 실행되는 메서드
Lifting state up
- Lifting state up 이란?
자식 컴포넌트의 어떤 액션을 통해 부모 컴포넌트의 state 를 변경시키는 작업.
- why??
컴포넌트 단위로 로직을 작성하기 때문에
- how??
1.상위 컴포넌트에서 state 를 변경시키는 method 를 만듭니다.
2.만든 modthod 를 자식 컴포넌트에게 props 로 넘겨준다.
- 자식 컴포넌트에서는 넘겨받은 props를 싱행시킨다.
Handle Async function
- setTimeout에서 실행되는 함수안에서 일어나는 연산 들을 가져오기
function hello17th(callback){
  setTimeout(function(){
       var hello = "hello";
       var name = "jj"
       var im17 = "im17"
       callback( `${hello} ${name} ${im17}`);
},2000);
}

hello17th()  // undefined 와 callback is not a function 나온다.


// 그럼 어떻게 위에있는 코드를 실행할수 있을까 ?

// 이렇게 callback 함수를 인자안에 작성하면 위에 작성한
// 변수들을 모아서 사용할수 있다.

hello17th(function(value){
    console.log(value);
    })

// 2초후에 실행된다.
// hello jj im17
Class OR Function Component의 차이
virual Dom
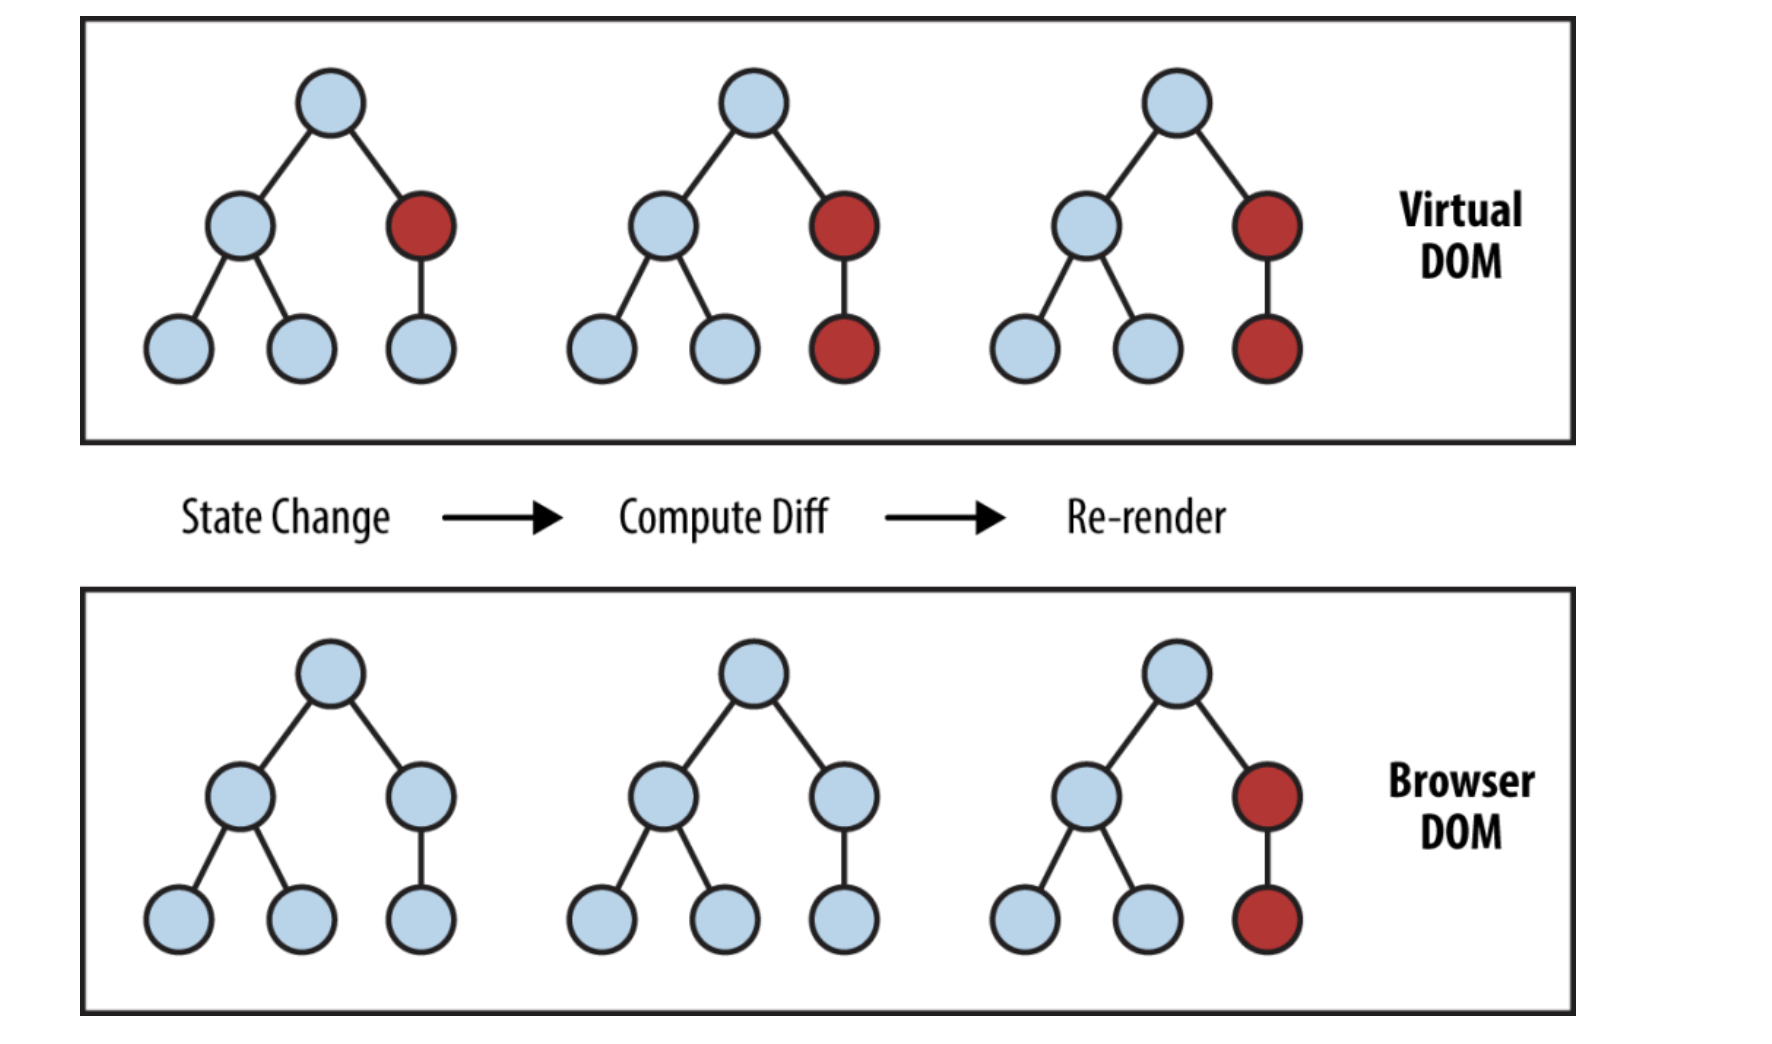
virual Dom 을 간단하게 설명한다.
브라우저에 HTML 을 받으면 그것을 바로 RealDom 에 적용시키지 않고 virual Dom 을 만들어 브라우저에 있는 Dom 과 virual Dom 을 비교해서 바뀐 부분만 변경해준다.
ReactDom 과 reactNative 차이점?
리엑트를 사용해서 웹사이트에 올리고 싶다?
ReactDom 을 쓰면됨
import ReactDOM from "react-dom";

ReactDOM.render(<App />, document.getElementById("root"));
리엑트를 사용해서 웹사이트에 올리고 싶다?
reactNative 쓰면됨
——————-생활코딩예제———————————-
Component 만들기
HTML tag
<html>
  <body>
    <header>
      <h1>WEB</h1>
      world wide web!
    </header>

    <nav>
      <ul>
        <li><a href="1.html">HTML</a></li>
        <li><a href="2.html">CSS</a></li>
        <li><a href="3.html">JavaScript</a></li>
      </ul>
    </nav>

    <article>
      <h2>HTML</h2>
      HTML is HyperText Markup Language.
    </article>
  </body>
</html>
App.js
import React, { Component } from "react";
import logo from "./logo.svg"; //필요없다 현재
import "./App.css";

class Content extends Component {
  render() {
    return (
      <article>
        <h2>HTML</h2>
        HTML is HyperText Markup Language.
      </article>
    );
  }
}

class TOC extends Component {
  render() {
    return (
      <nav>
        <ul>
          <li>
            <a href="1.html">HTML</a>
          </li>
          <li>
            <a href="2.html">CSS</a>
          </li>
          <li>
            <a href="3.html">JavaScript</a>
          </li>
        </ul>
      </nav>  }
}

// 컴퍼넌트를 만들때는 항상 하나의 최상의 tag로 시작해야한다.

class Subject extends Component {
  render() {
    return (
      <header>
        <h1>WEB</h1>
        world wide web!
      </header>
    );
  }
}

// App이라는 것이 Component 를 만들 것이다.
// App 는 render 라는 메소드를 가지고 있다.

class App extends Component {
  render() {
    return (
      <div className="App">
        <Subject></Subject>
        <TOC></TOC>
        <Content></Content>
      </div>
    ); // class =  에서 calssName으로 바뀜
  }
}

export default App;
Props 만들기
import React, { Component } from "react";
import logo from "./logo.svg"; //필요없다 현재
import "./App.css";

class Content extends Component {
  render() {
    return (
      <article> // props
        <h2>{this.props.title}</h2>
        {this.props.desc}
      </article>
    );
  }
}

class TOC extends Component {
  render() {
    return (
      <nav>
        <ul>
          <li>
            <a href="1.html">HTML</a>
          </li>
          <li>
            <a href="2.html">CSS</a>
          </li>
          <li>
            <a href="3.html">JavaScript</a>
          </li>
        </ul>
      </nav>
    );
  }
}

// 컴퍼넌트를 만들때는 항상 하나의 최상의 tag로 시작해야한다.
class Subject extends Component {
  render() {
    return (
      <header> // props
        <h1>{this.props.title}</h1>
        {this.props.sub}
      </header>
    );
  }
}

// App이라는 것이 Component 를 만들 것이다.
// App 는 render 라는 메소드를 가지고 있다.

class App extends Component {
  render() {
    return (
      <div className="App">
        <Subject title="WEB" sub="world wide web!"></Subject>
        <Subject title="menu" sub="this is what I wanted to build"></Subject>
        <TOC></TOC>
        <Content
          title="HTML"
          desc=" HTML is HyperText Markup Language."
        ></Content>
      </div>
    );
  }
}

export default App;
Component 파일로 분리하기
만약 하나의 파일에 component가 수천개 있다면 복잡할 것이다.
App.js
main JS 파일
import React, { Component } from "react";
import logo from "./logo.svg"; //필요없다 현재
import TOC from "./component/TOC";
import Subject from "./component/subject";
import Content from "./component/content";
import "./App.css";

// App이라는 것이 Component 를 만들 것이다.
// App 는 render 라는 메소드를 가지고 있다.

class App extends Component {
  render() {
    return (
      <div className="App">
        <Subject title="WEB" sub="world wide web!"></Subject>
        <Subject title="menu" sub="this is what I wanted to build"></Subject>
        <TOC></TOC>
        <Content
          title="HTML"
          desc=" HTML is HyperText Markup Language."
        ></Content>
      </div>
    ); // class =  에서 calssName으로 바뀜
  }
}

export default App;
component파일 안에
subject.js
component파일
import React, { Component } from "react";

// 컴퍼넌트를 만들때는 항상 하나의 최상의 tag로 시작해야한다.

class Subject extends Component {
  render() {
    return (
      <header>
        <h1>{this.props.title}</h1>
        {this.props.sub}
      </header>
    );
  }
}

export default Subject;
component파일 안에
content.js
component파일
import React, { Component } from "react";
class Content extends Component {
  render() {
    return (
      <article>
        <h2>{this.props.title}</h2>
        {this.props.desc}
      </article>
    );
  }
}

export default Content;
component파일 안에
TOC.js
component파일
import React, { Component } from "react";

class TOC extends Component {
  render() {
    return (
      <nav>
        <ul>
          <li>
            <a href="1.html">HTML</a>
          </li>
          <li>
            <a href="2.html">CSS</a>
          </li>
          <li>
            <a href="3.html">JavaScript</a>
          </li>
        </ul>
      </nav>
    );
  }
}

export default TOC;
state의 사용
리팩토링과 마찬가지이다.
import React, { Component } from "react";
import logo from "./logo.svg"; //필요없다 현재
import TOC from "./component/TOC";
import Subject from "./component/subject";
import Content from "./component/content";
import "./App.css";

// App이라는 것이 Component 를 만들 것이다.
// App 는 render 라는 메소드를 가지고 있다.

class App extends Component {
  constructor(props) {
    super(props);
    this.state = {
      subject: { title: "WEB", sub: "world wide web!" }
    };
  }
  render() {
    return (
      <div className="App">
        <Subject
          title={this.state.subject.title} //this 로 constructor 에 속성값 불러온다.
          sub={this.state.subject.sub}
        ></Subject>
        <TOC></TOC>
        <Content
          title="HTML"
          desc=" HTML is HyperText Markup Language."
        ></Content>
      </div>
    ); // class =  에서 calssName으로 바뀜
  }
}

export default App;
state (Key)
복수의 앨리먼트를 생성할 때는
key라는 특수한props를 사용해야 합니다. 여기서는 key의 사용법을 소개합니다.
App.js
import React, { Component } from "react";
import logo from "./logo.svg"; //필요없다 현재
import TOC from "./component/TOC";
import Subject from "./component/subject";
import Content from "./component/content";
import "./App.css";

// App이라는 것이 Component 를 만들 것이다.
// App 는 render 라는 메소드를 가지고 있다.

class App extends Component {
  constructor(props) {
    super(props);
    this.state = {
      subject: { title: "WEB", sub: "world wide web!" },
      contents: [
        // 1. contents 키값과 value 값으로 [] 만들고 그안에 내용을 적는다.
        { id: 1, title: "HTML", desc: "HTML is information" },
        { id: 2, title: "CSS", desc: "CSS is information" },
        { id: 3, title: "JS", desc: "JS is information" }
      ]
    };
  }
  // 2.render() 메소드 안에 TOC data = {this.state.contents} 넣어준다.
  // 3.그리고 TOC component 로 이동한다.
  render() {
    return (
      <div className="App">
        <Subject
          title={this.state.subject.title}
          sub={this.state.subject.sub}
        ></Subject>
        <TOC data={this.state.contents}></TOC>
        <Content
          title="HTML"
          desc=" HTML is HyperText Markup Language."
        ></Content>
      </div>
    ); // class =  에서 calssName으로 바뀜
  }
}

export default App;
이전 TOC.js
import React, { Component } from "react";

class TOC extends Component {
  render() {
    return (
      <nav>
        <ul>
          <li>
            <a href="1.html">HTML</a>
          </li>
          <li>
            <a href="2.html">CSS</a>
          </li>
          <li>
            <a href="3.html">JavaScript</a>
          </li>
        </ul>
      </nav>
    );
  }
}

export default TOC;
이후 TOC.js
import React, { Component } from "react";

class TOC extends Component {
  render() {
    var lists = [];
    var data = this.props.data; // <TOC data={this.state.contents}></TOC> 연결된다.
    var i = 0;
    // 여러게의 엘리먼트를 자동으로 생성할때 콘솔에 에러가 발생한다. 왜냐하면 각각의 목록에 키값을 주라는 것이다.
    // 이것은 react 가 필요로 하는 것이기 때문에 넣어 주어야 한다.
    // li tag 에 key 를 넣고 값은 App 의 프로퍼티에 있는 dt
    while (i < data.length) {
      lists.push(
        <li key={data[i].id}>
          <a href={"/content/" + data[i].id}>{data[i].title}</a>
        </li>
      );
      i = i + 1;
    }

    return <nav>{lists}</nav>;
  }
}

//     <ul>
//       <li><a href="1.html">HTML</a></li>
//       <li><a href="2.html">CSS</a></li>
//       <li><a href="3.html">JavaScript</a></li>
//     </ul>

export default TOC;
이벤트 state props 그리고 render 함수
- App.js
import React, { Component } from "react";
// import logo from "./logo.svg"; //필요없다 현재
import TOC from "./component/TOC";
import Subject from "./component/subject";
import Content from "./component/content";
import "./App.css";
// import ReactDOM from "react-dom";

// react 는 특이한점 state or props 가 바뀌면 render 함수가 다시 호촐된다. render() 함수의 하위함수들도싹다 호출된다.화면이 다시 그려진다.

class App extends Component {
  constructor(props) {
    super(props);
    this.state = {
      mode: "welcome", // 이벤트 준비
      subject: { title: "WEB", sub: "world wide web!" },
      welcome: { title: "welcom", desc: "hello react!!!" }, // 이벤트 준비
      contents: [
        { id: 1, title: "HTML", desc: "HTML is information" },
        { id: 2, title: "CSS", desc: "CSS is information" },
        { id: 3, title: "JS", desc: "JS is information" }
      ]
    };
  }

  render() {
    let _title = null; // 이벤트 변수
    let _desc = null; //  이벤트변수
    if (this.state.mode === "welcome") {
      _title = this.state.welcome.title;
      _desc = this.state.welcome.desc;
    } else if (this.state.mode === "read") {
      _title = this.state.contents[0].title;
      _desc = this.state.contents[0].desc;
    }

    return (
      <div className="App">
        <Subject
          title={this.state.subject.title} // 이벤트 위에서 변수 가져옴
          sub={this.state.subject.sub} // 이벤트 위에서 변수 가져옴
        ></Subject>
        <TOC data={this.state.contents}></TOC>
        <Content title={_title} desc={_desc}></Content>
      </div>
    );
  }
}

export default App;
이벤트 설치
다시 랜더링 되는거 방지하기
e.preventDefault() 사용하기
import React, { Component } from "react";
// import logo from "./logo.svg"; //필요없다 현재
import TOC from "./component/TOC";
import Subject from "./component/subject";
import Content from "./component/content";
import "./App.css";
// import ReactDOM from "react-dom";

// react 는 특이한점 state or props 가 바뀌면 render 함수가 다시 호촐된다. render() 함수의 하위함수들도싹다 호출된다.화면이 다시 그려진다.

class App extends Component {
  constructor(props) {
    super(props);
    this.state = {
      mode: "welcome", // 이벤트 준비
      subject: { title: "WEB", sub: "world wide web!" },
      welcome: { title: "welcom", desc: "hello react!!!" }, // 이벤트 준비
      contents: [
        { id: 1, title: "HTML", desc: "HTML is information" },
        { id: 2, title: "CSS", desc: "CSS is information" },
        { id: 3, title: "JS", desc: "JS is information" }
      ]
    };
  }

  render() {
    let _title = null; // 이벤트 변수
    let _desc = null; //  이벤트변수
    if (this.state.mode === "welcome") {
      _title = this.state.welcome.title;
      _desc = this.state.welcome.desc;
    } else if (this.state.mode === "read") {
      _title = this.state.contents[0].title;
      _desc = this.state.contents[0].desc;
    }

    return (
      <div className="App">
        {
          /* <Subject
          title={this.state.subject.title} // 이벤트 위에서 변수 가져옴
          sub={this.state.subject.sub} // 이벤트 위에서 변수 가져옴
        ></Subject> */
          // App 함수안에 <subject> 를 풀어해친후 테그안에 OnClick  을 넣느다.
          // 이때 e 파마미터를 추가하여 e.preventDefault() 호출한다.
          // 그러면 다시 랜더링하는것을 방지할수 있다.
          <header>
            <h1>
              <a
                href="/"
                onClick={function(e) {
                  alert("hello");
                  e.preventDefault();
                }}
              >
                {this.state.subject.title}
              </a>
            </h1>
            {this.state.subject.desc}
          </header>
        }

        <TOC data={this.state.contents}></TOC>
        <Content title={_title} desc={_desc}></Content>
      </div>
    );
  }
}

export default App;
state 변경하기
두가지 필요
- setState() 메소드 사용
- bind(this) this 묶어주기
setState 로 꼭 state 값을 바꿔줘야 한다.
하지만
주의
아래 코드에서는 아니다.
그이유는 컴퍼넌트가 생성이 끝난 다음에 동적으로 state를 바꿀때는 다르기 때문이다.
this.setState({}) 이렇게 해주어야 한다. 그래야 react 가 안다.
class App extends Component {
constructor(props) {
    super(props);
    this.state = {}

    }
    render(){
    if (this.state.mode === "welcome") {
    //블라브라
    }
    }
import React, { Component } from "react";
// import logo from "./logo.svg"; //필요없다 현재
import TOC from "./component/TOC";
import Subject from "./component/subject";
import Content from "./component/content";
import "./App.css";
// import ReactDOM from "react-dom";

// react 는 특이한점 state or props 가 바뀌면 render 함수가 다시 호촐된다. render() 함수의 하위함수들도싹다 호출된다.화면이 다시 그려진다.

class App extends Component {
  constructor(props) {
    super(props);
    this.state = {
      mode: "read", // 이벤트 준비
      subject: { title: "WEB", sub: "world wide web!" },
      welcome: { title: "welcom", desc: "hello react!!!" }, // 이벤트 준비
      contents: [
        { id: 1, title: "HTML", desc: "HTML is information" },
        { id: 2, title: "CSS", desc: "CSS is information" },
        { id: 3, title: "JS", desc: "JS is information" }
      ]
    };
  }

  render() {
    let _title = null; // 이벤트 변수
    let _desc = null; //  이벤트변수
    if (this.state.mode === "welcome") {
      _title = this.state.welcome.title;
      _desc = this.state.welcome.desc;
    } else if (this.state.mode === "read") {
      _title = this.state.contents[0].title;
      _desc = this.state.contents[0].desc;
    }

    return (
      <div className="App">
        {
          /* <Subject
          title={this.state.subject.title} // 이벤트 위에서 변수 가져옴
          sub={this.state.subject.sub} // 이벤트 위에서 변수 가져옴
        ></Subject> */

          <header>
            <h1>
              <a
                href="/"
                onClick={function(e) {
                  e.preventDefault();
                  // 클릭시 this.state.mode 값을 바꾸는 명령을 할것이다.
                  // this.state.mode = "welcome" 이것은 자바스크립트에서 허락하지 않는다.
                  // 이럴때 2가지를 해야한다.
                  // 1. setState() 메소드를 쓴다.
                  // 2. bind(this) this 가 바뀌는 것을 잡아준다.
                  this.setState({
                    mode: "welcome"
                  });
                }.bind(this)}
              >
                {this.state.subject.title}
              </a>
            </h1>
            {this.state.subject.desc}
          </header>
        }

        <TOC data={this.state.contents}></TOC>
        <Content title={_title} desc={_desc}></Content>
      </div>
    );
  }
}

export default App;
컴포넌트 이벤트 만들기
이벤트를 사용만 했지 만들지는 않았다.
이벤트의 생상자가 되어보자
브라우저에서 WEB 을 클릭하면 메시지 내용이 바뀌는 것을 구현한다.
App.js 파일
import React, { Component } from "react";
// import logo from "./logo.svg"; //필요없다 현재
import TOC from "./component/TOC";
import Subject from "./component/subject";
import Content from "./component/content";
import "./App.css";
// import ReactDOM from "react-dom";

// react 는 특이한점 state or props 가 바뀌면 render 함수가 다시 호촐된다. render() 함수의 하위함수들도싹다 호출된다.화면이 다시 그려진다.

class App extends Component {
  constructor(props) {
    super(props);
    this.state = {
      mode: "read",
      subject: { title: "WEB", sub: "world wide web!" },
      welcome: { title: "welcom", desc: "hello react!!!" },
      contents: [
        { id: 1, title: "HTML", desc: "HTML is information" },
        { id: 2, title: "CSS", desc: "CSS is information" },
        { id: 3, title: "JS", desc: "JS is information" }
      ]
    };
  }

  render() {
    let _title = null;
    let _desc = null;
    if (this.state.mode === "welcome") {
      _title = this.state.welcome.title;
      _desc = this.state.welcome.desc;
    } else if (this.state.mode === "read") {
      _title = this.state.contents[0].title;
      _desc = this.state.contents[0].desc;
    }

    return (
      <div className="App">
        {
          <Subject
            title={this.state.subject.title}
            sub={this.state.subject.sub}
            onchanged={function() {
              this.setState({
                mode: "welcome"
              });
            }.bind(this)} //원하는 이름의 함수를 만든다. 이름은 onChanged
          ></Subject>
        }

        <TOC data={this.state.contents}></TOC>
        <Content title={_title} desc={_desc}></Content>
      </div>
    );
  }
}

export default App;
subject.js 파일
- 여기에서 OnClick 을 사용해 e.preventDefault(); 와 this.props.onchanged(); 와 .bind(this) 조합하면 된다.
import React, { Component } from "react";


class Subject extends Component {
  render() {
    return (
      <header>
        <h1>
          <a
            href="/"
            onClick={function(e) {
              e.preventDefault();
              this.props.onchanged();
            }.bind(this)}
          >
            {this.props.title}
          </a>
        </h1>
        {this.props.sub}
      </header>
    );
  }
}

export default Subject;